

အားလုံးမဂၤလာပါေနာ္ သည္ေန႕တင္မဲ့ နည္းလမ္းေလးကေတာ့ ဘေလာ့ကာမ်ားအတြက္ ဆိုဒ္ဘားမွာ
ေအာက္မွာ လိုအပ္တဲ့ ကုဒ္ေတြနဲ႕အတူ နည္းလမ္းကိုပါ ေသျခာ ပုံေလးနဲ႕ ရွင္းျပသြားပါမယ္...ေနာ္
အဆင့္ (၁)
►1- Blogger Singin ၀င္လိုက္ပါ။
►2- Dashboard ကိုသြားလိုက္ပါ။
►3- Template ကိုကလစ္ပါ..။
►4- Edit Html ကို၀င္ပါ..
►5- Ctrl+F (သို႕မဟုတ္) F3 အကူညီျဖင့္ ေပးထားတဲ့ ကုဒ္ကို ရွာလိုက္ပါ။
</head> သည္ကုဒ္ေလးကို ထည့္ရွာလုိက္ပါ... ေတြ႕႔ျပီဆိုတာနဲ႕ ေအာက္ကဇယားနဲကေပးထားတဲ့
ကုဒ္ေတြကို သူ႕ရဲ႕အေပၚကေန ကပ္ထည့္ေပးလိုက္ပါေနာ္....
<style>
.module h2 {
background-color: #D5D5D5;
border-radius: 20px 0 0 20px;
color: #FFFFFF;
font-family: Verdana;
font-size: 14px;
line-height: 32px;
margin: 0;
padding: 0 0 0 20px;
text-shadow: 2px 1px 1px #222;
}
.module h2 a {
border-left: 5px solid #ffffff;
color: #101921;
float: right;
font-size: 14px;
text-decoration: none;
text-shadow: none;
padding: 0 10px;
position: relative;
-moz-transition: padding 0.1s linear;
-webkit-transition: padding 0.1s linear;
-ms-transition: padding 0.1s linear;
-o-transition: padding 0.1s linear;
}
.module h2 a:hover {
padding: 0 32px;
}
.module h2 a:before, .module h2 a:after {
content: "";
height: 0;
position: absolute;
top: 50%;
width: 0;
}
.module h2 a:before {
border-bottom: 8px solid transparent;
border-right: 8px solid #ffffff;
border-top: 8px solid transparent;
left: -12px;
margin-top: -8px;
}
.module h2 a:after {
border-bottom: 6px solid transparent;
border-top: 6px solid transparent;
left: -6px;
margin-top: -6px;
}
.module.blue h2 a {background-color: #A2D5EC;}
.module.blue h2 a:hover {background-color: #C5F0FF;}
.module.blue h2 a:after {border-right: 6px solid #A2D5EC;}
.module.blue h2 a:hover:after {border-right-color: #C5F0FF;}
.module.yellow h2 a {background-color: #FCE98D;}
.module.yellow h2 a:hover {background-color: #FFD700;}
.module.yellow h2 a:after {border-right: 6px solid #FCE98D;}
.module.yellow h2 a:hover:after {border-right-color: #FFD700;}
.module.green h2 a {background-color: #bada55;}
.module.green h2 a:hover {background: #C7E176;}
.module.green h2 a:after {border-right: 6px solid #bada55;}
.module.green h2 a:hover:after {border-right-color: #C7E176;}
.module.red h2 a {background-color: #F0A5B5;}
.module.red h2 a:hover {background-color: #FFC7D2;}
.module.red h2 a:after {border-right: 6px solid #F0A5B5;}
.module.red h2 a:hover:after {border-right-color: #FFC7D2;}
</style>
အိုေက...ကုဒ္ေတြ ထည့္ျပီးတာနဲ႕ save template ကိုရဲရဲေဆ့လုိက္ပါ... လက္ေတြ႕စမ္းသတ္ထားလို႕
အာမခံပါတယ္ေနာ္.... ကုဒ္ထည့္တာေတာ့ မွန္ဖို႕လိုပါတယ္.... အိုေခ...
အဆင့္ (၂)
►1. Login လုပ္လုိက္ပါ ဘေလာ့ကာကို
►2. Layout ကိုကလစ္ရပါ့မယ္ မိမိတို႕ Dashboard ကေနေပါ့
►3. Add a Gadget ကိုကလစ္ေပးလုိက္ပါ
►4. HTML/Javascript. ကိုကလစ္ျပီး က်လာတဲ့ ေဘာက္ေလးထဲမွာဘဲ
►5. ေအာက္ကေပးထားတဲ့ ကုဒ္ေတြကို ေကာ္ပီယူ ထည့္လိုက္ပါ
ေအာက္ကကုဒ္ေတြကို ျပင္ဆင္တဲံအခါ အေပၚက နမူနာ ပုံေလးနဲ႕ စာၾကည့္လုိက္ပါေနာ္.....
<div class="module blue">
<h2>ေခါင္းစဥ္ <a href="Link URL">ကလစ္ပါ</a></h2>
</div>
<div class="module yellow">
<h2>ေခါင္းစဥ္ <a href="Link URL">ကလစ္ပါ</a></h2>
</div>
<div class="module green">အိုေက..အေပၚကကုဒ္ေတြကို ထည့္ျပီဆိုတာနဲ႕ လိုအပ္တဲ့ ျပင္ဆင္ခ်က္ေတြ လုပ္ပါမယ္......
<h2>ေခါင္းစဥ္ <a href="Link URL">ကလစ္ပါ</a></h2>
</div>
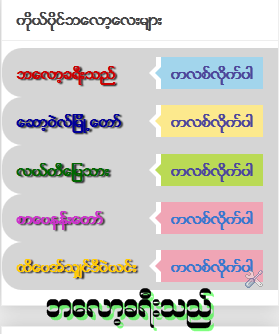
(၁) ေခါင္းစဥ္ဆိုတဲ့ ေနရာမွာ က်ေနာ္ နမူနာျပထားတာက ဘေလာ့အမည္ေတြေပါ့..
(၂) link URL ကေတာ့ မိမိညႊန္ျပလိုတဲ့ ဘေလာ့(သို႕)အျခား စသျဖင့္ လိပ္စာ ထည့္ေပးရပါမယ္
(၃) ကလစ္ပါ ဆိုတဲ့ေနရာမွာလဲ ႏွစ္သက္တာ ထည့္ေပးပါ သူကေတာ့ ကိုယ္ညႊန္တဲ့ေနရာ သြားဖို႕
ေမာက္ေထာက္ကလစ္ရမဲ့ေနရာပါ...
............ကုဒ္မ်ားကို လိုသေလာက္ ပြါးနိဳင္ပါတယ္ေနာ္..... ....
မွတ္ခ်က္.... ဘေလာ့ကိုမွ မဟုတ္ပါ တျခားေဆာ့၀ဲလ္ ေဒါင္းဖို႕ မိတ္ေတြဘေလာ့ေတြ စသျဖင့္ လိုအပ္သလို မိမိတို႕ အသုံးျပဳနိဳင္ပါေၾကာင္းးးးးးးးးးးးး
No comments:
Post a Comment